Mastering the Weighted Dip
The weighted dip is the kind of exercise that separates the casual lifters from the gym warriors. Sure, bodyweight dips are great, but once you start adding extra weight to your frame, that’s when the real magic happens. This move turns you into a machine, chiseling out your triceps, chest, and shoulders like they’re sculpted from granite.
Introduction to Weighted Dips
Weighted dips take a conventional exercise and turn the intensity dial greatly. You’re not just moving your own bodyweight anymore—you’re strapping on extra pounds to push your muscles beyond their comfort zone. That means more gains, more potency, and, yes, a lot more sweat.
Overview and Benefits
At its core, the weighted dip is all about building upper body power. By adding weight to the traditional dip, you’re challenging your triceps, chest, and shoulders in ways that bodyweight exercises just can’t match. The more weight you add, the harder your muscles work, and the more they grow. It’s as simple as that. Plus, weighted dips are a great compound exercise, meaning you’re engaging multiple muscle groups at once—perfect for those days when you want to get the most bang for your workout buck.
Muscles Targeted
Weighted dips are a true multi-tasker when it comes to muscle engagement.
Lineup of muscles that get to work when you add weight to your dips:
- Triceps. The star of the show. Your triceps do most of the heavy lifting during dips, extending your arms to push your body (and the added weight) up.
- Chest. Especially when you lean forward during the movement, your chest gets in on the action, making weighted dips a great exercise for building pecs.
- Shoulders. Your deltoids get a serious workout as they stabilize your body throughout the entire range of motion.
- Core. Keeping yourself stable under all that weight requires solid core engagement, so don’t be surprised if your abs feel the burn, too.
In short, weighted dips are a total upper body powerhouse. They’ll help you build tissue, increase potency, and carve out that defined, athletic look.
Proper Technique and Form
So, you’ve decided to dive into the world of weighted dips—good call. But before you start piling on the plates, let’s talk technique. Proper form isn’t just about looking good (though that’s a bonus), it’s about keeping your joints happy and your muscles firing on all cylinders. If you’re not careful, bad form can turn your dip dreams into a shoulder nightmare.
Correct Setup for Weighted Dips
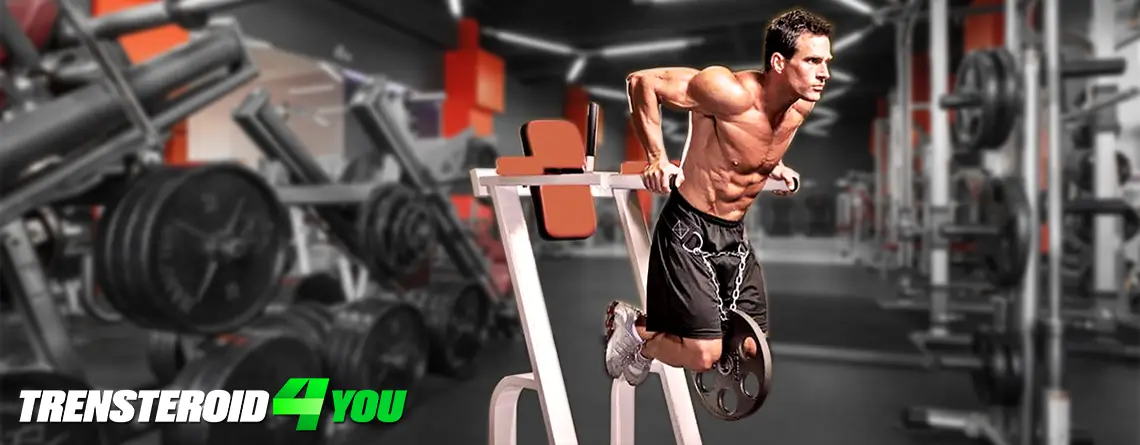
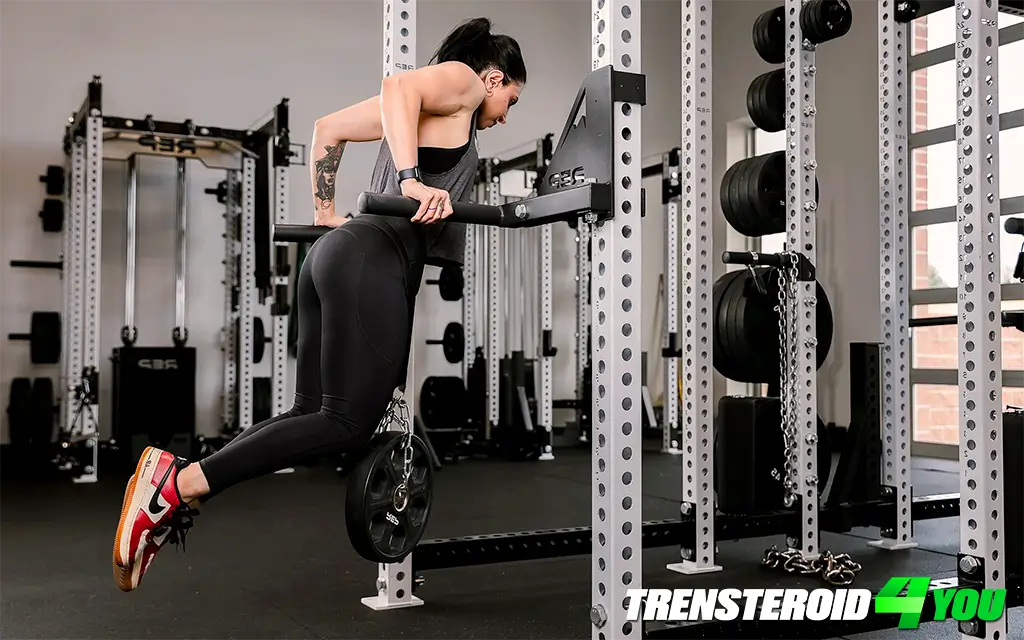
Before you start dipping like a boss, you’ve got to nail the setup. First things first: grab a dip belt—the one with the chain that makes you feel like you’re gearing up for a superhero mission. Attach your weight, whether it’s a plate or a dumbbell, making sure it’s secure but not swinging around like a wrecking ball.
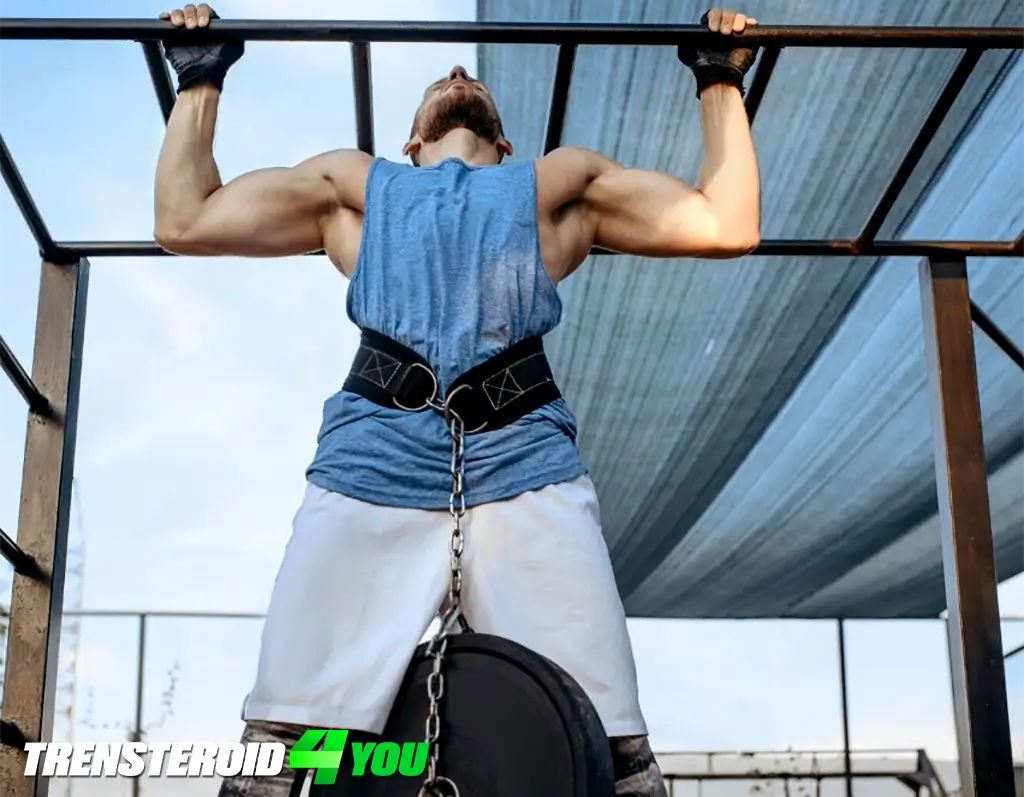
Next, hop up onto the dip bars, gripping them with your hands slightly wider than shoulder-width apart. Keep your elbows tucked in—flaring them out is a fast track to shoulder issues. Cross your legs behind you or keep them straight for balance, and lean forward slightly to activate your chest along with your triceps.
Lower yourself down until your elbows are bent at about a 90-degree angle, making sure your shoulders don’t dip too far below your elbows—because we’re building strength here, not wrecking our joints. Push back up explosively, and boom, you’ve just nailed a textbook weighted dip.
Common Mistakes to Avoid
Even seasoned lifters fall victim to some classic dip mistakes.
Avoid these, and you’ll keep your progress steady and your body injury-free:
- Flaring elbows. This puts unnecessary strain on your shoulders and can lead to injury.
- Going too deep. Dipping below parallel can overextend your shoulders and strain your joints.
- Leaning too far forward. While a slight forward lean targets the chest, going too far forward can mess up your form and reduce triceps activation.
- Rushing through reps. Speedy dips might look cool, but controlled, slow reps give you better muscle engagement.
Keep these in mind, and your weighted dips will stay smooth and pain-free.
Advanced Tips for Optimal Results
Once you’ve mastered the basics, it’s time to take your weighted dips to the next level.
Advanced tricks to optimize your gains:
- Pause at the bottom. Add a brief pause when your elbows are at 90 degrees to increase time under tension. It’s a brutal but effective way to fire up your muscles.
- Change your grip width. Slight adjustments to your hand positioning can shift the emphasis between your chest and triceps, allowing you to target specific areas more effectively.
- Use progressive overload. Don’t get stuck at the same weight forever. Gradually increase the load over time to keep your tissue and adapting.
By fine-tuning these details, you’ll squeeze every bit of benefit out of your weighted dips, ensuring you stay on the path to massive gains.
Integrating Weighted Dips into Your Routine
Alright, so you’ve got your weighted dips down to a science, but where do they fit into your workout routine? Dips aren’t just an accessory exercise; they can be the star of the show or the perfect complement to other big lifts. Whether you’re looking to pair them with other upper body movements or use them to cap off a push day, weighted dips have a versatile role in almost any workout plan.
Pairing with Other Exercises
Weighted dips are a fantastic addition to any push day routine. They fit perfectly alongside big compound lifts like bench presses and overhead presses, where they can be used to hit your chest and triceps from a different angle.
After heavy bench presses, switch to weighted dips for higher volume, focusing on squeezing out those last few drops of energy. Alternatively, you can add dips at the end of an upper body day to ensure your triceps and chest get the maximum pump before calling it quits.
Weighted dips are also a great follow-up to shoulder presses, as they target the deltoids and triceps in a slightly different way, providing a balanced workout for the entire upper body.
Recommended Frequency and Volume
How often should you be doing weighted dips?
The answer depends on your overall training plan, but here’s a solid guideline:
- Beginner. Start with 2 sessions per week, with 3-4 sets of 6-8 reps.
- Intermediate. Bump it up to 2-3 sessions per week, with 4 sets of 8-10 reps.
- Advanced. If you’re a dip master, go for 3 sessions per week, with 4-5 sets of 10-12 reps.
The key is not overdoing it—especially when you’re adding weight. You want enough volume to push your muscles but not so much that you’re risking shoulder strain. Find the balance that works for your aspirations.
Progression Strategies for Adding Weight
When it comes to weighted dips, you’re going to want to progressively add weight over time. The goal is to continually challenge your muscles, forcing them to adapt and become more potent.
Begin by adding 10-15 pounds, making sure your form stays perfect. Once you can complete your sets with ease, bump it up. Don’t go from 10 pounds to 45 pounds overnight. Instead, aim to add 5-10 pounds per week, ensuring you maintain control over each rep. Keep a log of your sets, reps, and weights so you know when it’s time to up the ante.
Safety and Injury Prevention
While weighted dips are a fantastic way to build potency, they can also be risky if you’re not careful. The added weight means there’s more strain on your joints, especially your shoulders and elbows. But don’t worry—if you approach them with proper technique and a focus on safety, you can avoid injuries and keep making gains without setbacks.
Preventing Shoulder and Elbow Strain
Your shoulders and elbows are the MVPs when it comes to dips, but they’re also the most vulnerable. The extra weight adds pressure to your joints, which can quickly lead to discomfort or, worse, injury if you’re not paying attention.
How to keep your joints safe:
- Warm-up thoroughly. Jumping into heavy dips with cold shoulders is a recipe for disaster. Spend 5-10 minutes warming up with mobility exercises, light shoulder rotations, and a few bodyweight dips before you strap on any weight.
- Keep your range of motion in check. Lowering too far can overstress your shoulders. Aim for your elbows to bend at around 90 degrees and avoid dipping below that unless you’re an advanced lifter with bulletproof joints.
- Mind your grip. If your grip is too wide, it can put extra stress on your shoulders, while a narrow grip can strain your elbows. Find a grip width that feels comfortable and natural to keep everything in alignment.
These approaches will ensure that your dips are effective and safe for your organism.
Importance of Warm-Up and Mobility
I know, I know—warm-ups can feel like a chore. But trust me, your body will thank you later. A good warm-up prepares your muscles and joints for the task ahead but also helps prevent injury. Focus on warming up your shoulders, elbows, and chest before you start your weighted dips. Dynamic stretches, light band work, and mobility drills are your best friends here.
Mobility is equally important. Having good shoulder mobility means you can hit those deep dips without compromising your form or putting unnecessary strain on your joints. Regular mobility work, like shoulder dislocates or thoracic extensions, will keep you flexible and injury-free in the long run.
Alternatives and Variations
If you’re not quite ready to jump into weighted dips or you’re looking to mix things up, there are plenty of alternatives and variations that can still give you that upper body potency boost. Whether you’re a beginner, nursing a sore shoulder, or just want to target different groups, there’s a dip variation for everyone.

Bodyweight Dips for Beginners
If you’re new to dips, it’s a good idea to start with the basics before throwing weights into the mix. Bodyweight dips are a great way to build up strength and confidence without risking injury. They allow you to perfect your form and get a feel for the movement before adding extra load.
Bodyweight dips for different levels of difficulty:
| Dip Variation | Level | Benefits |
| Parallel Bar Dips | Beginner | Focuses on triceps, chest, and shoulders |
| Bench Dips | Beginner | Easier on the shoulders, great for starting out |
| Assisted Dips (with band) | Intermediate | Provides support while building strength |
Start with these variations if you’re new to the movement, and once you’re comfortable, you can graduate to the weighted version.
Variations to Target Different Muscles
If you’re looking to hit different muscle groups or just want to keep things interesting, there are plenty of dip variations to choose from. Each tweak to the standard dip can shift the focus to different parts of your upper body, allowing for a more rounded workout.
Variations to try:
- Chest dips. Lean forward more to target your chest. This variation shifts the emphasis from your triceps to your pecs, making it a great option for chest day.
- Tricep dips. Keep your torso more upright to focus primarily on your triceps. This version is perfect if you’re looking to torch those arm muscles.
- Ring dips. If you want a serious challenge, give ring dips a try. The instability of the rings requires extra shoulder and core engagement, making this an advanced variation that will test your balance and strength.
These variations help you target specific areas and add variety to your routine, ensuring that your muscles are always guessing and growing. With these alternatives and variations in your toolkit, you’ll never get bored—and you’ll keep seeing gains, no matter how you choose to dip.